Flashing the Delta 7024 to a Dell 8024
Disclaimer & Caveats
This page will guide you through flashing a Delta Networks 7024 (DNI7024F) to a Dell PowerConnect 8024 (PC8024F). We are not responsible for any damaged devices or property resulting from this guide. As of now this process is irreversible, so be sure you want to do it.
Advantages
The Delta switch comes with a very limited "demo build" of Fastpath, with little to no documentation. There's also no updates for it ever released. By switching to Dell, you gain regular firmware updates (as recent as a few months ago), and plenty of documentation. You get a more fleshed out OS including a web interface as well.
There's one downside: the Dell firmware is very picky about SFP+ optics. You must use Dell branded optics or they won't work. However if you're using DAC cables, any brand will work without issue.
Prerequisites
This guide assumes you're familiar with the basics like TFTP, obtaining a serial console to the device, etc. If you're not, this guide is probably not for you. Before touching your switch, read this document from beginning to end to get a basic idea of what you'll be doing - do not skip this step.
The risk of doing this is mitigated if you're prepared and follow closely. It's a good idea to have the switch on a UPS while you do this, if you lose power after the erase command before you've flashed the new bootloader, your device will be bricked (however it can be recovered with a PowerPC capable JTAG unit).
Download the firmware ZIP below. It contains your bootloader, OS, and all the documentation you'll need.
Dell Firmware Zip
Zip Updated: 05-16-2018
FW Version: 5.1.12.2
MD5: ec0075e95945b3f86ce4a6c9a8549f86
Connect to the serial console port on the switch and open a terminal window (9600 8N1). Also be sure to connect the management port on the switch to a network that has layer 2 access to your tftp server. Note: the management port must be connected, not the standard copper ports!
TFTP Preparation
You need to temporarily run a TFTP server. If you're on windows and need a temporary TFTP server, I recommend Tftpd32 Portable Edition. Copy 8024boot.bin from the ZIP to your TFTP server root directory. Copy the OS image from ZIP to your TFTP server root directory as well (PC8024v5.1.12.2.stk).
Flash Preparation
Reboot the switch while watching the serial output, it should prompt you to hit any key, or maybe b to interrupt boot. Do so and it should drop you into the u-boot console, which should look like this:
=>
With all the following commands, copy and paste them exactly as you see them. Do not try to manually type them!
Use the memory read command to verify your Delta bootloader is where it should be - this ensures the commands to follow will use the correct location:
md 0xfff80000 20
The output should match this exactly:
fff80000: 27051956 552d426f 6f742032 3030392e    '..VU-Boot 2009.
fff80010: 30362028 41707220 31392032 30313120    06 (Apr 19 2011
fff80020: 2d203133 3a35363a 34382900 60000000    - 13:56:48).`...
fff80030: 3c20d000 60213f80 38000000 9401fffc    < ..`!?.8.......
fff80040: 9401fffc 9421fff8 3c00ffff 6000fffc    .....!..<...`...
fff80050: 9421fff8 9001000c 48000005 7dc802a6    .!......H...}...
fff80060: 800e171c 7dc07214 48002029 3c600002    ....}.r.H. )<`..
fff80070: 60631200 7c600124 4c00012c 48001fa5    `c..|`.$L..,H...
If the output on your switch does not match this exactly, STOP! Pastebin your switches output and get in touch with us on ServeTheHome.
Carrying on, assuming your md output matched ours: It's time to load in the Dell bootloader to a safe temporary location in RAM. You also need to set a temporary IP for the switch, as well as set the IP of your TFTP server destination:
setenv ipaddr 192.168.1.50
setenv serverip 192.168.1.49
Now copy the Delta bootloader to a temporary address in RAM for holding:
tftpboot 0x300000 8024boot.bin
The tftpboot command should have output similar to the below:
=> tftpboot 0x300000 8024boot.bin
Enet starting in 1000BT/FD
Speed: 1000, full duplex
Using TSEC1 device
TFTP from server 192.168.2.49; our IP address is 192.168.1.50
Filename '8024boot.bin'.
Load address: 0x300000
Loading: Got error 4
T #################################################################
     #######
done
Bytes transferred = 1048576 (100000 hex)
=>
If you see Error 4 that's normal, just be sure the bytes transferred matches. Now you need to verify that the temporary address contains the Dell bootloader:
md 0x300100 20
The output should match the below exactly:
00300100: 480fef01 48000039 436f7079 72696768    H...H..9Copyrigh
00300110: 74203139 38342d32 30303620 57696e64    t 1984-2006 Wind
00300120: 20526976 65722053 79737465 6d732c20     River Systems,
00300130: 496e632e 38400002 48000008 7c621b78    Inc.8@..H...|b.x
00300140: 7c6000a6 5464045e 548403da 54840524    |`..Td.^T...T..$
00300150: 7c800124 4c00012c 7c000278 3820ffff    |..$L..,|..x8 ..
00300160: 7c1603a6 7c1c43a6 7c1d43a6 7c3053a6    |...|.C.|.C.|0S.
00300170: 7c1453a6 7c1e0ba6 7c0103a6 7cc63278    |.S.|...|...|.2x
If it doesn't match, STOP. You can safely reboot back to Fastpath by typing reset or power cycling it. If you'd like, pastebin the output and get in touch with us on ServeTheHome. If it does match, continue on.
Erasing and replacing the bootloader
You now have the Dell bootloader we need stored in RAM. We need to erase the existing bootloader, then copy the Dell loader from that RAM address to the bootloader address. From here on, be incredibly careful, and follow the commands exactly.
Disable the flash write protection:
protect off all
Erase the Delta bootloader:
erase 0xfff00000 0xffffffff
Copy the Dell bootloader to the boot sector. Running this command might take a minute, so be patient and do not panic or try to cancel it:
cp.b 0x300000 0xfff00000 0x100000
Congratulations, you've installed the Dell bootloader (which can now load the Dell software image). DO NOT REBOOT YET! First verify the Dell bootloader is in the bootloader location:
md 0xfff00100 20
The output from your switch should match the below exactly:
fff00100: 480fef01 48000039 436f7079 72696768    H...H..9Copyrigh
fff00110: 74203139 38342d32 30303620 57696e64    t 1984-2006 Wind
fff00120: 20526976 65722053 79737465 6d732c20     River Systems,
fff00130: 496e632e 38400002 48000008 7c621b78    Inc.8@..H...|b.x
fff00140: 7c6000a6 5464045e 548403da 54840524    |`..Td.^T...T..$
fff00150: 7c800124 4c00012c 7c000278 3820ffff    |..$L..,|..x8 ..
fff00160: 7c1603a6 7c1c43a6 7c1d43a6 7c3053a6    |...|.C.|.C.|0S.
fff00170: 7c1453a6 7c1e0ba6 7c0103a6 7cc63278    |.S.|...|...|.2x
Now check that the last bootloader instruction was also copied:
md 0xFFFFFFFC 1
The output should match the below exactly:
fffffffc: 4bfff004 K...
If both match exactly, continue on to Booting Dell below - the risky part is over. However if they don't, don't panic. Try running md 0xfff80000 20 - if the output is the same as when you ran it at the beginning of this gide (with the words u-boot) it means your u-boot bootloader was not overwritten. If so, that means the Delta bootloader is still there. Either you didn't properly disable write protection, or something else has gone wrong. You can reboot into Fastpath like normal, and contact us on the forums.
However if it matches neither, something has failed. We have yet to see this, but just in case you do - be sure you're running the exact commands here, and do the guide again from tftpboot 0x300000 8024boot.bin and onwards until you get the bootloader where it should be. If you follow the commands, it should work. Do not reboot or pull power until this is resolved.
Booting Dell
You now have the Dell bootloader in the proper section of the PowerPC flash. You just need to reboot and the real fun begins:
reset
It will reboot, and the Dell loader will take some time formatting the flash.
It should prompt you saying that the VPD data is empty, and you must enter the MAC address, serial, and service tag. The MAC should be on a sticker on the side or bottom of the switch. Enter this when it asks in the suggested format (without colons). If you can't find your MAC, use an online MAC generator to generate a MAC with the proper format. For the serial and service tag, just make up a short string of letters/numbers.
Eventually it should drop you at a prompt similar to this (it will probably not match exactly):
Boot Menu 3.1.4.5

Options available
1 - Start operational code
2 - Change baud rate
3 - Retrieve event log using XMODEM
4 - Load new operational code using XMODEM
5 - Display operational code vital product data
6 - Abort boot code update
7 - Update boot code
8 - Delete backup image
9 - Reset the system
10 - Restore configuration to factory defaults (delete config files)
11 - Activate Backup Image
12 - Password Recovery Procedure
13 - Reformat and restore file system
[Boot Menu]
Now we can begin the process of loading a firmware image over serial.
Loading the Dell OS Image
Because Dell is very forward thinking and does not have TFTP in their bootloaders, we need to load the actual OS image over serial. Yes, the same way you did back in the early 90's.
To do so you need to download and use TeraTerm as it supports XMODEM transfers with 1K blocksize - trust me, you want this if you don't have all day. You can download the ZIP version and just run it from a folder if you don't want to install any new software - just launch it with the ttermpro.exe file.
Close putty or whatever serial console program you were using, and launch TeraTerm, then select your serial port. The boot menu prompt should come back up, now in Teraterm - just hit ? to get the switch to populate the boot menu options again.
We need to change the switches baud rate to 115200, or else the transfer will take 6+ hours. Enter 2 in the menu, and then select the 115200 option. The console will go unresponsive, as it's running a new baud rate. You need to change the baud rate in TeraTerm. Navigate to Setup > Serial Port and change the baud to 115200 - then click OK:

Hit enter a few times and the switch should come back. Note: When you change the switches baud rate it only takes effect for this session. It will reset to 9600 on the next boot.
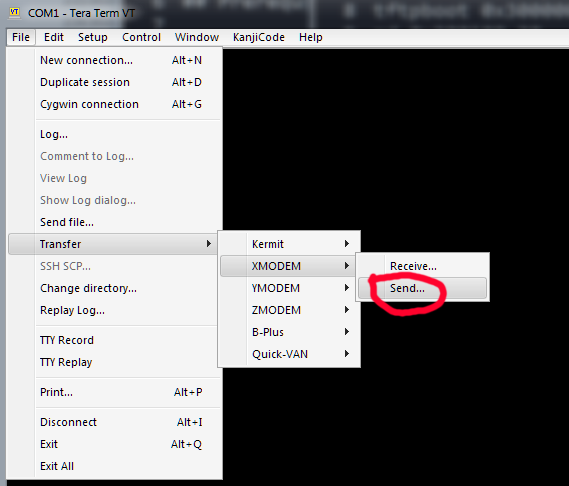
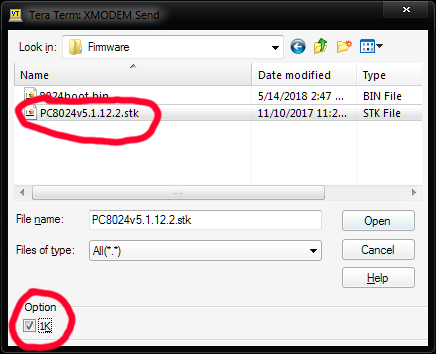
Now we just need to start the transfer. Send the switch 4 for Load new operational code - you will see CKCKCK at the bottom - it's waiting for a transfer. In TeraTerm, navigate to File > Transfer > XMODEM > Send, then select the PC8024v5.1.12.2.stk file you extracted from the ZIP. MAKE SURE before clicking OK that you check the 1K box! Once you have checked it, just click Open and it will start the transfer.
The transfer will take about 18 minutes. Grab a drink. When it's done, the switch will give an error similar to error obtaining active image name - this is normal. Wait a minute or so and press enter a few times - you should return to the boot menu.
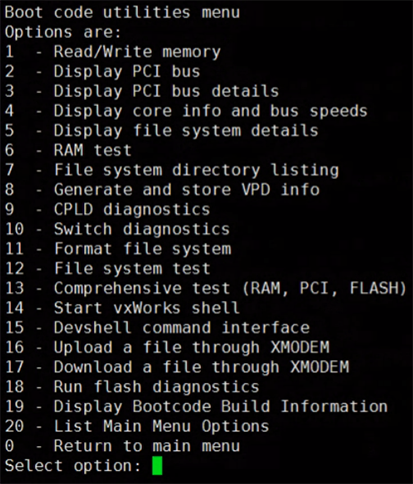
Now send the switch the boot menu option 7 - Update boot code - this will reflash the bootloader using Dell's official flash routine and will re-enable flash write protect, which is a good thing. When it finishes, it should auto reboot the switch. If it just returns you to the boot menu, send 1 - Start operational code.
When it does boot, it will say uncompressing image then you will stop getting output in your terminal. This is because on boot the console speed reset back to 9600 baud. You will now need to set your terminal's baudrate back to 9600 - the switch will go unresponsive as it boots into the OS and resets the console speed back to default. In TeraTerm go to Setup > Serial Port and set the baud back to 9600, then send enter a couple times - you should now be at the OS prompt.
Updating the CPLD
The switch should have succesfully booted into the Dell OS. Congratulations dude, you got a dell! However you're not done yet. You need to flash the Dell code to the CPLD. Long story short, it's a little processor that monitors and controls the fans, power supplies, chassis lights, that kind of thing.
At the OS prompt, enter the enable level then send the update command:
enable
dev cpldUpdate
You should get output matching the below:
Device #1 Silicon ID is ALTERA04(01)
erasing MAXII device(s)...
erasing MAXII UFM block...
erasing MAXII CFM block...
programming CFM block...
programming UFM block...
verifying CFM block...
verifying UFM block...
DONE
CPLD update exited with a return code of 0
error_address 398931407, exit_code 0, format_version 2

value = -1 = 0xffffffff
The error_address at the end is normal - just ensure you see both the programming and verifying steps completed. Now you need to cold power the switch to reset the CPLD - unplug the switch power, wait a couple seconds, and plug it back in. Do not skip this step or you will have very wonky behavior!
Once it boots back all the way into the OS, check the CPLD status:
enable
dev cpldTest
You should see output like the below. Most importantly, make sure the CPLD revision matches (should be 6):
Board Type                : Campbell 24F
Board Version             : 2
CPLD Revision             : 6 (0x6)
Make sure it can see your fans and power supplies as well. You shouldn't have any fan tray missing or fan tray error statements (an RPS: Failed is normal if one of the two power supplies are not plugged in). You now have a fully flashed Dell PC8024F.
Please check out and follow the included guides in the Documentation folder to configure your new switch.
If you have any unexpected results, output that doesn't match this guide, or something is not clear, please do not hesitate to email me - Unlike the Quanta, I do not personally own a Delta 7024 so this guide was written by sending code back and forth to a 7024 owner. This means some sections might not be as clear as they could be.
Updating
Dell will probably release new firmware packages for the 8024. You can check here. If you see new versions you can use them to update your switch just like it was a stock Dell. Just boot into the full OS and use TFTP to download the new STK image file. Then boot into the bootloader and update the boot code as well (every STK firmware image comes with new bootcode). You may also need to update the CPLD again (check the new firmware release notes).
Note: If you have not converted your Delta switch yet, do not use a new firmware package from Dell to do it. Use the custom package linked at the beginning of this guide for the initial conversion.
Secret Boot Menu
You should not need this, but just in case you are curious: there is a hidden low-level boot menu inside the Dell bootloader. Reboot the switch into the normal bootloader. When it asks for you to enter an option, enter 30. When it asks for a password, use pc62xxkinnick - you will be dropped into a low level boot menu. Note: many things here can break your switch! be careful:
Thanks:
-Jon Sands
-Xiaofei Sun + Zhu Junhang for being the first to test this, then sending me all the command output!
Contributing:
The markdown source for these guides is hosted on our Github repo. If you have any suggested changes or additions feel free to submit a pull request.
Documentation version: v0.8 (11-29-25)